Meatless Monday: Polenta with Roasted Veggies

Posted on

After dinner tonight, Hubby said, “I like polenta.”

Agreed.  I don’t fix it nearly often enough.  It’s delicious.  And, easy.  And, hearty.  It’s really a great winter dish.  When I think of polenta, I think of sophisticated grits.  Polenta is generally made with yellow corn, whereas Southern grits are generally white corn, but they are basically the same thing.

I adapted this Williams-Sonoma recipe due to time.  I really MEANT to go to the grocery store yesterday.  And, when I knew it just wasn’t going to happen, I really MEANT to AT LEAST menu plan last night.  That didn’t happen either.

I quickly threw together a menu during Munchkin’s nap, then managed to also shower (Thank The Lord!), then waited for him to wake up.  (He always seems to choose the days that I need to run an errand after nap to sleep the longest!)  After giving him some time to fully wake up, let the fur babies out, and put on shoes, it was after 5.  Eek!  I thought I was very efficient, but shopping for four dinners just takes time, especially when comparing food labels.  (No fun, and an activity that usually leaves me frustrated and annoyed with the food industry.  There are SO many things on my “look out” list, and it feels like a new item gets added every. single. day.)  Before I knew it, Hubby was calling me to say he was on the way home from work.  And, I still hadn’t checked out, yet!  Yikes!

I game-planned on the way home where somehow I managed to get only green lights and NO after-work traffic.  Hallelujah!  Get Munchkin out of car seat.  Leave car unlocked.  Unlock house, turn off alarm, preheat oven, thaw Munchkin’s frozen snack that I forgot to take out of the freezer before leaving for the store. Let Munchkin run around with the fur babies outside (within eyesight) while I unload the car (in 3 stages).  Lock car (to avoid waking up at 2 am wondering if I locked it!).  Pull out only the veggies needed for dinner and get busy chopping!

Munchkin really wanted to play outside ALL DAY today, but it was freakin’ COLD!  The sun barely came out.  We played outside for a few minutes this afternoon before nap, but we did not get in our usual Vitamin D quota.  Our backyard is not exactly baby toddler-proofed.  Munchkin can now manage the step down from our kitchen door onto our breezeway and the proceeding steps down;  one goes toward the courtyard that is enclosed by a picket fence, and the second goes toward our paver patio that leads to a set of steps flanked by a 3-foot retaining wall.  With no railing or gate.  It’s been on our list for YEARS, but we’ve never had a physical need for a railing.  Aside from the fact that building code requires one, we just figured we would get around to it before placing the house on the market.  Little did we know that we would actually WANT one prior to that.  (I wonder how many baby gates I could rig together to create one long railing?)  Poor Munchkin was heading towards the stairs just as I was picking up the chef’s knife!  (Don’t worry – no one was harmed during dinner prep!)  As I put the knife down and ran out to follow (i.e., distract) him, he headed towards the kids outdoor chairs we have set up around his sensory bin.  Aha!  I grabbed the chair and the munchkin and brought them both inside without so much as a “Maaaaom.”  Success!  He happily played with that chair for the next 15 minutes until Hubby got home.  I’m always relieved when something so simple as bringing a chair into the kitchen avoids a before-dinner-hunger meltdown, or an anytime meltdown for that matter.  Then, I begin to wonder if EVERY meltdown is so easily avoided?

Hubby walked in just before I put the veggies in the oven to roast, and then I realized just how long this recipe was going to take.  Way too long to consider actually feeding Munchkin this dish for dinner.  That’s when I realized that I could cut the time in half by leaving off the last half of the instructions.  Luckily, I’ve made polenta often enough to know that it doesn’t have to bake in the oven.  I actually have NEVER baked it.  I’ve always served it warm off the stove, just how one would serve grits for Saturday morning breakfast.

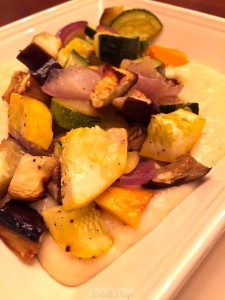
Munchkin asked for seconds, and Hubby approved with the aforementioned statement.  I think I pulled it off.   😉   You can be the judge. . .

Polenta with Roasted Veggies

Adapted from Williams-Sonoma

Ingredients

3 TBS EVOO

1 small eggplant, cut into 3/4-inch pieces

2 small zucchini, cut into 3/4-inch pieces

2 small yellow summer squash, cut into 3/4-inch pieces

1/2 red onion, cut into 3/4-inch pieces

1 orange bell pepper, seeded and cut into 3/4-inch pieces

Salt and freshly ground pepper

1 cup stone-ground polenta (I purchase corn meal; Hodgson Mill is what I used tonight to be exact.  As with any corn product, verify that it is non-GMO!)

2 TBS unsalted butter

1 cup (4 oz) grated Parmesan cheese (Buy a wedge and grate it yourself!)

2 cups (8 oz) shredded fontina cheese

Instructions

Preheat the oven to 450°F.

In a large bowl, combine the eggplant, zucchini, summer squash, red onion and bell pepper. Drizzle with the 3 tablespoons oil, season with salt and pepper, and toss to combine. Arrange in a single layer on a large baking sheet. Roast, tossing once, until the vegetables are caramelized, about 30 minutes.

Meanwhile, in a heavy saucepan, bring 4 cups water to a boil over high heat. Add a large pinch of salt.  Reduce heat to medium.  Stirring constantly, very slowly add the polenta. Cook, whisking constantly, until the polenta begins to thicken and all lumps are gone, about 5 minutes. Reduce the heat to low and continue to cook the polenta, stirring frequently, until the polenta is soft, about 25 minutes. Add the butter, Parmesan and fontina and stir until the cheeses melt.

Serve the polenta in a bowl topped with the roasted veggies.  Add more cheese if desired 😉

IMG_2526


Bon Appétit!

Share on Facebook

Meatless Monday: Cauliflower Lentil Curry

Posted on

I love a good curry.  Panang curry is my current go-to when ordering out.  And, while I usually satisfy my curry craving with take-out, it is surprisingly easy to incorporate curry into home-cooked meals.  Each time I’ve attempted a curry recipe at home, I’ve been rewarded with nothing short of yumminess!  (Very technical term, here!)

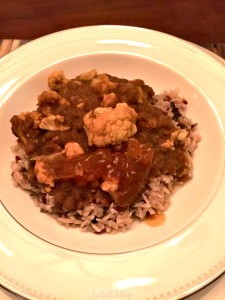
Tonight’s meal does not disappoint!  Cauliflower is not one of my staple vegetables.  It just seems to me, well, boring.  And, I’ve found that if I find an ingredient or recipe “boring,” I don’t get excited about fixing it.  That usually leads to me suggesting a spontaneous eat-out.  I find myself pinning lots of cauliflower dishes to my recipe board, but I think this is the first one to make it onto my menu.  During dinner, I said to Hubby, “The cauliflower actually tastes GOOD!” We both had seconds. I even opted to have leftovers instead of going out to eat. For burgers. That’s saying something!

I followed the suggestions in this recipe completely:  incorporating papaya and apricot preserves.  I would suggest you do the same – SO GOOD!

Cauliflower Lentil Curry

(Pinch of Yum via Pinterest)

Ingredients

  • 1 onion, finely chopped
  • 8 cloves garlic, minced
  • 1-2 tablespoons fresh grated ginger
  • 2 tablespoons oil
  • ¼ cup curry paste (I used a red Thai curry paste)  (Find it on your international aisle)
  • ½ teaspoon turmeric
  • ½ teaspoon curry powder
  • 3 cups vegetable broth + 3 cups water  (I used 4 cups broth and 2 cups water because I just used a box of stock this time; 1 box = 4 cups)
  • 2 cups dry yellow lentils or yellow split peas (Green lentils worked just fine!)
  • 1 or more heads cauliflower, chopped into bite sized pieces
  • apricot or mango jam + cilantro for serving (be brave!) (I found apricot jam; make sure to find one with no corn syrup or other crazy ingredients.  All you need is fruit and maybe a little sugar and pectin.)
  • salt to taste
  • 1 Papaya (See Pinch of Yum’s note below; I chopped up a small papaya, threw it into my mini food processor, and added it in just before serving. You won’t actually taste papaya, but there will be a layer of sweet along with the curry flavor.  Yum!)
Instructions
  1. Saute the onion, garlic, and ginger with the oil until soft, about 3 minutes. Add the curry paste, turmeric, and curry powder and stir fry for another 1 minute. Add the broth and water and whisk until incorporated. Bring to a boil.
  2. Add the lentils and simmer for 20-40 minutes. I left the pot uncovered (house smells amazing) and stopped by to stir every so often. Add more water or broth as necessary. Yellow split peas will take longer and, in my experience, they soak up more of the water so you might need to add more.
  3. When the lentils are done or almost done, add the cauliflower. There should be enough liquid left in the pan to boil/steam the cauliflower, so add some if you need it. Cover and simmer for 5-10 minutes or until cauliflower is tender-crisp. Stir to combine; season with salt and top with cilantro and jam.
Notes
I pureed one papaya into a smooth sauce and added it to the curry so it would be a bit more creamy, plus I love the sweet, fresh flavor it adds. If you want it more saucy, puree a sweet curry-complimenting fruit like papaya or mango and stir it in. Coconut milk would also be a perfect addition!
I served the curry over this Harvest Medley rice (found at Costco).  This rice is AMAZING!  My dad found this rice first and shared with us because it is that good.  It will spice up any ordinary rice dish.
Cauliflower Lentil Curry

Cauliflower Lentil Curry

Bon Appétit!
Share on Facebook

One Pot Wonder Wednesday: Whole Roasted Chicken

Posted on

I’m cheating this week.  I actually made this Sunday, but it is too good not to share!  This recipe has been in my folder for several years.  I really should make it more often than I do.  It’s super easy and super good for you.  It’s also an impressive-looking dish.  The one-pot aspect makes it perfect for company.  (In fact, I have made it several times for dinner parties!) I also like using whole chickens because it gives everyone his or her favorite kind of meat.  My preference is dark meat, but I find that most people prefer white meat.  And, a bonus is that you can then use the discarded carcass for some awesome homemade chicken stock! (If you’re really being resourceful, save the peels from all the veggies you use in this recipe to add to the stock, too!)

I mentioned yesterday that Hubby and I are attempting to organize our lives this year.  One example of our reorganization is advanced meal planning.  Now, I also mentioned that I’m pretty good about dinner prep, but we’ve been lacking in our breakfast and snack selections.  We usually have leftovers for lunch (Hubby brown bags it everyday!), but there are the occasional nights when I’m not feeling up to my original plan or maybe I forgot to thaw a key ingredient (that doesn’t happen to anyone else, does it?!).  On these *rare* (wink, wink, nudge, nudge) occasions, we’ll grab a pizza or one of our other take-out favorites (Malaya or Hankook), and there are not always leftovers.  Hubby then either scrounges for lunch, which usually turns into him skipping it altogether, or he picks up another favorite:  Chick-fil-A (Oh so delicious, but the #1 is not especially good for the waistline).  While at Costco last weekend, we picked up lots of healthy snack options for him and also decided to grab one of their 2-packs of organic whole chickens.  This way, we could have something on hand in case our menu changed over the course of the week.  Since it rained all. freakin’. weekend., I decided to make this recipe, so that Hubby wouldn’t have to stand over the Big Green Egg with an umbrella (that has definitely happened before).

This is also a great recipe to use up whatever you have in the fridge.  It calls for sage and thyme, but any herbs would be delicious.  Any vegetables you have that you would normally roast would also be great!  This time, my onion was rather large, so I ended up using only half for the cavity; I spread the other half with the other veggies around the chicken.  Delicious!  I couldn’t find celery root this time (if you haven’t tried it before, please give it a go!), so my picks were turnips, parsnips, and some old carrots.  You could easily use baby carrots to save on the prep time.  I’ve used sweet potatoes and regular potatoes before, too.  I considered throwing in some Brussels sprouts, but they were earmarked for another dinner, so I stopped myself.  My point is: use whatever sounds good!  Have I sufficiently talked-up this recipe?  😉

Whole Roasted Lemon-Herb Chicken on a Bed of Vegetables

(Via Eating Well)

Ingredients

  • 1/4 cup fresh sage leaves, divided
  • 1/4 cup fresh thyme sprigs, divided
  • 2 lemons, divided
  • 2 teaspoons minced garlic
  • 2 tablespoons extra-virgin olive oil, divided
  • 1 teaspoon salt, divided
  • 3/4 teaspoon freshly ground pepper, divided
  • 1 small onion, quartered
  • 1 4- to 4 1/2-pound chicken
  • 4 large carrots, cut into 1/2-inch chunks
  • 3 medium turnips, peeled (see Tip) and cut into 1/2-inch cubes
  • 2 celeriac roots (1 1/2-2 pounds total), peeled (see Tip) and cut into 1/2-inch cubes

Preparation

  1. Position rack in lower third of oven; preheat to 400ºF.
  2. Chop 8 sage leaves and place in a bowl with 2 teaspoons thyme leaves. Squeeze the juice from 1 lemon into the bowl. Add garlic, 1 tablespoon oil, 3/4 teaspoon salt and 1/2 teaspoon pepper; mix well. Set aside.
  3. Pierce the remaining lemon all over with a sharp fork. Cram the lemon, onion and the remaining sage and thyme into the chicken cavity.
  4. Place the chicken breast-side up on a cutting board. Use your hands to gently loosen the skin covering the breast, thighs and the top end of the drumsticks. Smear the lemon-herb mixture under the skin, covering as much of the meat as possible.
  5. Toss carrots, turnips and celeriac in a large bowl with the remaining 1 tablespoon oil and 1/4 teaspoon each salt and pepper until well coated.
  6. Place the chicken breast-side up in a large roasting pan (but not on a rack). Scatter the vegetables around the chicken. Bake, stirring the vegetables occasionally, until an instant-read thermometer inserted into the thickest part of a thigh without touching bone registers 165°F, 1 to 1 1/4 hours.
  7. Transfer the chicken to a clean cutting board and let rest for 10 minutes before carving. Transfer the vegetables from the roasting pan to a serving dish with a slotted spoon, leaving behind as much of the fat as possible. Serve the chicken with the vegetables.

I have a good size round Le Creuset (thanks to my MIL) that is perfect for this dish!  Best part:  oven-to-table, and it’s festive enough for company!  I also use the probe setting on my oven.  Do y’all have this option?  It’s pretty great!  Hubby usually cooks the big pieces of meat on the Egg, so I don’t pride myself on being a great judge of “doneness.”  (Apparently, “doneness” isn’t a word 😉 )  We’ve tried several different kitchen thermometers, but I must have a knack at breaking them!  So far, though, the probe has worked well for me.  On my oven, I preheat to the desired temperature.  Then, I go into the options and select probe cooking.  I then have the option to select the temperature at which the meat should be considered done AND the temperature at which I want it to cook.  Insert one end of the probe into the port in the oven and the other end into the meat.  Then, just wait for the oven to beep and tell you “probe cooking end.”  Easy peasy!  No fooling with a hot oven and hot piece of meat trying to get an accurate read!

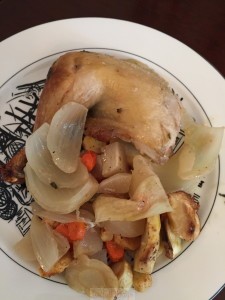
Unfortunately, I didn’t get a picture of the finished chicken before Hubby cut into it, so all I have is a picture of my favorite part: the leg with a spread of yummy veggies!

Whole Roasted Chicken

Whole Roasted Chicken

Remember when I said sometimes plans change and we MAY pick up a pizza instead?  Well, my plan was to cook this Sunday evening for dinner and then have the leftovers available for Hubby for the week.  But, our grocery trip was delayed, and there was no way I could prep AND cook in time for dinner.  (The only downside to this meal is the cook time.)  So, we picked up Fellini’s, and I made the chicken AFTER we ate dinner.  It cooked while Munchkin had bath and story time, and Hubby was able to prep his salad for lunch the next day before bed.  Not what we had planned, but it ended up just fine!

Bon Appétit!

Share on Facebook

A Theme for 2015: Organize My Life

Posted on

2014 was a great year!  I’ve been having a blast watching Munchkin grow and being home with him every day is AMAZING!  (Thanks, Hubby!) But, somehow, it went by so fast.  2013 did the same thing.  Where has the time gone??  I keep a spreadsheet of projects and tasks (you do understand where I got the idea for Listfull Days, right?!), and I also have a tab entitled “Goals.”  Since I started the spreadsheet many MANY years ago, I’ve used this central spot to keep track of yearly goals and accomplishments.  I opened it up the other day to update it for 2015 and to see how I did in 2014.  Do you know what I found?  A yearly goals tab entitled “2012 goals.”  WHAT?  2012 was the last time I updated this?  Oops!

It actually makes sense when I think about it.  We finished a master suite remodel at the beginning of 2012.  I turned 30 in 2012.  I started my Bucket List in 2012.  I started Listfull Days in 2012.  I STARTED organized in 2012.  Then, I started a new position at work.  I got pregnant.  I was blessed with morning sickness all-day queasiness and night all-day exhaustion!  Thanks to the little Bambino; thanks to a hectic job; thanks to an even more hectic home improvement calendar; thanks to the cumulative effect of life in general.  And, somehow, 2013 snuck up on me!  In 2013, we worked on a basement renovation, which actually turned into a whole-house renovation of sorts, all while we nested for Bambino.  I know I got a lot done in 2013, but somehow the balance of organization-to-chaos shifted.  (Or, at least that’s how it felt!)  And, if I think 2013 snuck up on me, then 2014 just flew past me!  Munchkin turned ONE!  Munchkin started teething, and kept teething, and kept teething.  Now, I was unorganized and TIRED!  So, here it is 2015 and time to think about goals for the new year.

Well, let’s just simplify things.  I think I’m a little beyond listing out each task I want to check off this year.  Let’s just replace my goals list with my to-do list, hit “copy” and “paste,” and move on to actually checking things off.  So, instead of naming specific goals or resolutions or whatever you think about at the start of a new year or a new crossroads, I’m adopting a theme for 2015:  Get this shit organized!

Pardon my french, but at this point in time, the term feels applicable.  (On a side note, why do we call curse words “French?”  I don’t remember learning that in any of my French studies. 😉 )

I’m really loving this concept of a New Year’s Theme.  It applies to all aspects of my life in a physical or figurative manner:  my home (physically unorganized at the moment; just wait until you see my kitchen cabinets!), my exercise routine (inconsistent at best, nonexistent if I’m really being honest), my health maintenance (somehow I missed almost all of my annual appointments in 2014 all because I couldn’t organize myself to make phone calls!), my hobbies (blog included!), and my finances (thankfully, Hubby has stayed on top of this one for us; we’ve had a division of labor pretty much ever since we got married that works for us: he pays the bills and keeps an eye on investments and accounts; I do most of the day-to-day shopping and keep track of our budget.  Let’s just say it’s a good thing he looks at our account statements because I couldn’t tell you the last time I opened our budget file. 😯 )

My plan for implementation is to take it one area at a time.  Hopefully, I can get a physical room in the house organized every week, along with a more figurative aspect of my life.  This may be wishful thinking, and I know that some weeks will not go as planned due to other events as well as the level of disorganization I’m facing, but I’m using a rough guideline here.  The last thing I want to do is set unrealistic expectations and then get discouraged.  So far this weekend we were able to lay some groundwork for the rest of 2015.  Basically, we did a few temporary clean outs just to keep us from going crazy until we can do the heavy duty lifting in those areas.  We started with our office, which is always our dumping ground.  (I really should have taken a picture of what it looked like during the holidays.)  We at least got everything put away into its rightful place.  We also managed to make room for all of Munchkin’s new Christmas toys in the living room.  They still end up all over the floor by the end of the day, but at least now every toy has a home.  We cleaned out the freezer, fridge and pantry enough that we could make room for healthful foods.  We usually do a pretty good job of this on a regular basis, but y’all know what happens around the holidays!  And, while dinner is usually a healthy meal (and lunch, thanks to leftovers!), we wanted to start off the new year with better breakfast and snack options.  We always have lots of fruit for Munchkin, but we often scrounge for ourselves.  We also started off doing some minor arranging in the basement.  We wanted to get an idea of how much storage space we have available when we clean out other areas of the house.  Our efforts were a little interrupted on Saturday thanks to Mother Nature (more on that in my weekly update), but I still feel like we are off to a good start!

I hope everyone else is feeling good about the start of the New Year!  Even my Fur Baby is optimistic! 😉

Happy New Year!

Happy New Year!

Share on Facebook

Meatless Monday: Mushroom Risotto

Posted on

It’s the first Monday of the new year!  ! – ?  I’ve always had a love/hate relationships with Mondays.  To me, Monday has always been the start of a new week.  I’m sure this is a big debate for some of you.  The fact that one can select either Sunday or Monday as the first day of the week in any e-calendar is an indicator that this is a dividing subject.  Yes, Mondays can be tough in the sense of getting back into a routine, having that alarm clock go off rather than easing into wakefulness, and having to go back into the office.  (Those of you with kids may be laughing at any of the three previous statements!  Fur babies count, too! )  For some reason, Mondays are to me the first chance to get things right in the new week.  Hubby had both the 1st and the 2nd off from work, so we’ve been in extended vacation mode since last Wednesday.  I’d like to call this Monday the first chance to get things right in the new year!

So far, I think we’re off to a great start!  (Let’s revisit in a week 😉 )  I managed to menu plan for the first half of the week yesterday.  Lately, I feel like I’ve been scrambling to meal plan, grocery shop, and cook on Mondays, which leaves me feeling unorganized.  Hubby and I did some pseudo-organizing in the kitchen yesterday, and we decided we wanted to work on cleaning out the pantry.  How many open boxes of pasta do we have?  Too many!  How about containers of rice?  Again, too many!  So, this first meal of the week is attempting to use up some of that rice.  I found a mushroom risotto recipe on Pinterest that is made in the (gasp!) crockpot!  We’re giving it a go!  I LOVE risotto, but it is a time-consuming dish with all the necessary stirring.  You probably know by now that I LOVE my crockpot (French Onion Soup, Enchiladas, Chicken Stock, or BBQ chicken anyone?), so anytime I can put it to use AND simplify a complicated dish, that’s a win-win in my book!

Slow Cooker Risotto

(Wilderness Wife via Pinterest)

Ingredients

  • ¼ cup olive oil, plus a little extra
  • 2 shallots, minced
  • 1¼ cup arborio rice
  • ½ cup dry white wine
  • 3¾ cups low sodium chicken broth  (Use your homemade stock from this recipe!)
  • 1 tsp salt
  • 1 tsp dried thyme
  • ½ cup grated parmigiano-reggiano cheese  (really any hard Italian cheese will do)
  • 3 TBS heavy cream
  • 8 oz sliced mushrooms (Hubby likes baby bella over white)
Instructions
  1. Heat the oil in a saute pan and over medium heat saute the shallots until they are translucent.
  2. Coat the inside of the slow cooker with olive oil.
  3. Add the sauted shallots and oil to the slow cooker.
  4. Add the rice and coat with shallot/oil mixture.
  5. Add ¼ cup of wine and chicken broth.
  6. Add the salt and thyme and stir ingredients together.
  7. Place cooker on slow cooker and cook on high for 2 hours or until liquid is absorbed into rice.
  8. minutes before the rice is done, sauté mushrooms in sauté pan with 1TBS of olive oil and ¼ cup of white wine.
  9. Stir cream and cheese into slow cooker and stir. Let the mixture heat for another 5 minutes.
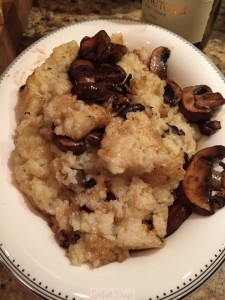
  10. Serve with mushrooms on top. (And, of course, my favorite side salad!) (And, of course, a glass of white wine – the one already opened for the recipe would be perfect 😉 )
Mushroom Risotto

Mushroom Risotto

I’ll be 100% honest and confess that this risotto is not AS good as the real thing, but it is pretty darn close.  And, the fact that I didn’t have to stand by the stove and stir it for 20 minutes while trying to entertain a toddler more than makes up for the slight difference in texture.  😀

Bon Appétit!


Share on Facebook